These are some personal notes for working with nRF52 hardware. The official documentation is oddly written and expects both too much and too little prior knowledge from the reader.
Running the Thread CLI
Thread has a CLI that allows you to manage your Thread network. It’s a good place to start since it’s easy to verify that everything is working right.
Required downloads
- nRF5_SDK_for_Thread_and_Zigbee_v4.1.0_32ce5f8
- gcc-arm-none-eabi-7-2018-q2
- nrfutil via
pip install --user nrfutil==6.1.0
Unpack these files and run export GNU_INSTALL_ROOT=<path>/bin with the output directory.
Required hardware
Building example program
- Navigate to
nRF5_SDK_for_Thread_and_Zigbee_v4.1.0_32ce5f8/examples/thread/cli/ftd/usb/pca10059/mbr/armgcc. - Build the program by running
make -j$(nproc). (make sureGNU_INSTALL_ROOTis set) - You should see a message like
DONE nrf52840_xxaaindicating successful compilation.
Flashing example program via DFU
DFU is a bootloader and updater that makes it possible to update the code that’s running on the nRF52 without hooking up a debugger. It also performs cryptographic checks to ensure that the code is trusted, although by default these checks are turned off during development.
When you plug your dongle into your computer’s USB port, you should see something like:
usb 1-1.2.1: new full-speed USB device number 6 using xhci_hcd
usb 1-1.2.1: New USB device found, idVendor=1915, idProduct=521f, bcdDevice= 1.00
usb 1-1.2.1: New USB device strings: Mfr=1, Product=2, SerialNumber=3
usb 1-1.2.1: Product: Open DFU Bootloader
usb 1-1.2.1: Manufacturer: Nordic Semiconductor
usb 1-1.2.1: SerialNumber: D88744B9EE73
cdc_acm 1-1.2.1:1.0: ttyACM0: USB ACM device
If you don’t see this, press the reset button (the side button next to the antenna) while the dongle is plugged in to enter DFU mode.
Make a note of the tty device shown in the console, and use it when using the following commands to flash the board:
$ nrfutil pkg generate \
    --hw-version 52 \
    --sd-req 0x00 \
    --application-version 1 \
    --application _build/nrf52840_xxaa.hex \
    app_dfu_package.zip
$ nrfutil dfu usb-serial \
    -pkg app_dfu_package.zip \
    -p /dev/ttyACM0
See Programming the nRF52840 MDK USB Dongle for more information.
Using the Thread CLI
After flashing the dongle, unplug it and plug it back in. You should see something like
usb 1-1.2.1: new full-speed USB device number 12 using xhci_hcd
usb 1-1.2.1: config 1 has an invalid interface number: 2 but max is 1
usb 1-1.2.1: config 1 has no interface number 0
usb 1-1.2.1: New USB device found, idVendor=1915, idProduct=cafe, bcdDevice= 1.00
usb 1-1.2.1: New USB device strings: Mfr=1, Product=2, SerialNumber=3
usb 1-1.2.1: Product: nRF52 USB Product
usb 1-1.2.1: Manufacturer: Nordic Semiconductor
usb 1-1.2.1: SerialNumber: D88744B9EE73
cdc_acm 1-1.2.1:1.1: ttyACM0: USB ACM device
Make a note of the tty, and use minicom -b 115200 -D /dev/ttyACM0 or screen /dev/ttyACM0 115200 to connect to the CLI.
As an example, type help into the CLI and press enter:
> help
bufferinfo
channel
child
...
Debugging
Required hardware
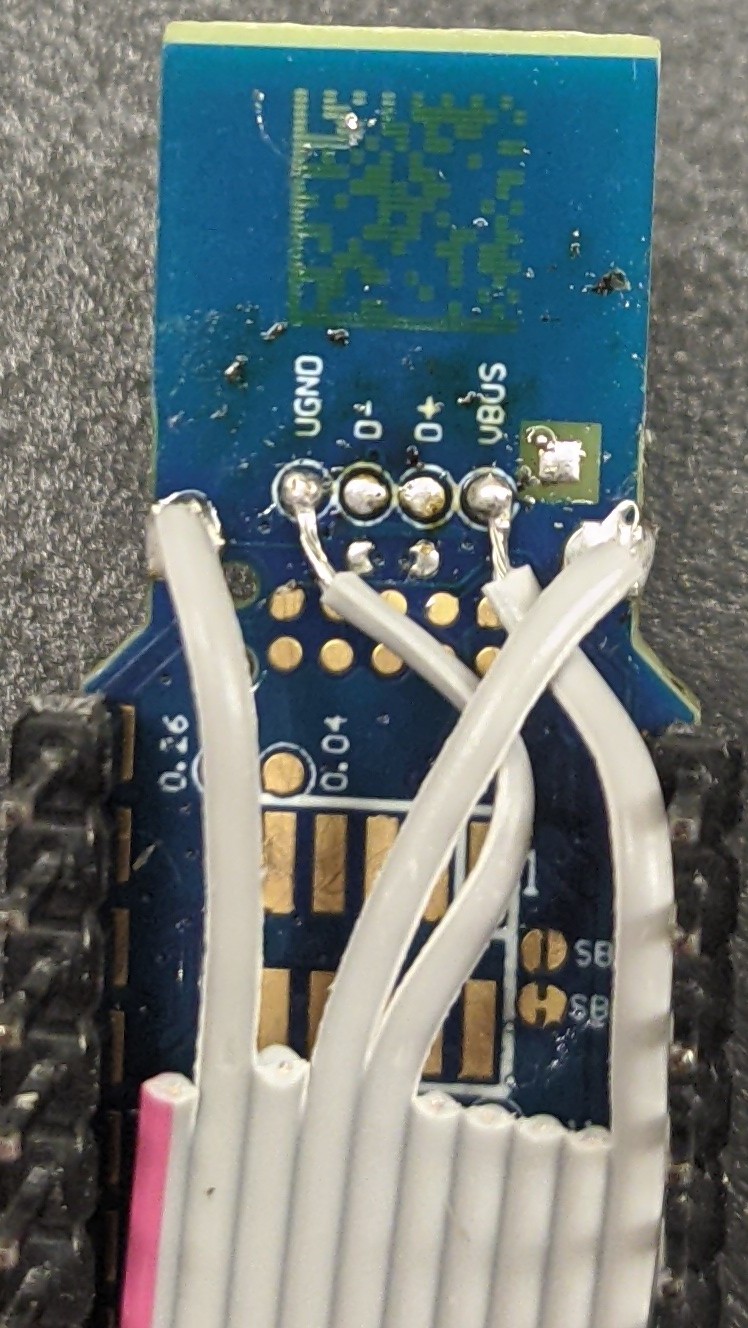
- ST-LINK v2. Make sure it looks like the one in the picture.
- several 2x5 IDC ribbon cables. These can be obtained cheap from eBay/Aliexpress. Get many because they’re getting cut up.
- soldering iron & related equipment
Setting up the hardware
- Cut the cable in half.
- Pin 1 is the pin with the red stripe. Peel the pins apart about 15-20mm and cut off pins 1, 3, 6, 7, 8, and 9.
- Solder the cable onto the dongle according to this image:
Running the debugger
- Download and unpack xPack OpenOCD
- Run
export OPENOCD_DIR=<path>with the path where you extracted OpenOCD - Plug everything together and run
"$OPENOCD_DIR/bin/openocd" -f interface/stlink.cfg -f target/nrf52.cfg -c "init"to open the debug interface. - Run
arm-none-eabi-gdb. The version from the gcc-arm-none-eabi-7-2018-q2-update may fail witherror while loading shared libraries: libncurses.so.5, so you can just whateverarm-none-eabi-gdbyour distro provides. - With gdb open, run
target remote :3333to connect to openocd. - For testing, press ctrl-c to stop execution, and
continueto resume it.
Flashing the DFU bootloader
- Follow all the instructions in [Debugging][].
- Navigate to
nRF5_SDK_for_Thread_and_Zigbee_v4.1.0_32ce5f8/examples/dfu/open_bootloader/pca10059_usb_debug/hex. There is a pre-built bootloader in this directory. For production use you will want to build your own bootloader with your own public key, but this is fine for development. - Connect your ST-Link to your dongle and use the following OpenOCD command to flash the bootloader:
"$OPENOCD_DIR/bin/openocd" -f interface/stlink.cfg -c "transport select hla_swd" -f target/nrf52.cfg -c "init; halt; program {open_bootloader_usb_mbr_pca10059_debug.hex} verify; reset; exit" - If you see
** Verified OK **, the flashing has been successful. - Unplug the ST-Link from the dongle and reinsert the dongle into the USB port. You should see LED2 slowly fading in and out and
usb 1-1.2.3: Product: Open DFU Bootloaderindmesg.